
Help & FAQ
How to get your edit out of Lightroom, how a reel comes together, and answers to the questions people ask most.
What you’ll need
Every edit tutorial starts from the same three things. Your reel shows your real Lightroom settings, and ends on your exact final export.


1. The original photo
The unedited RAW file from your camera (CR3, NEF, ARW, RAF, DNG and others).
2. Your edit settings
The small .xmp file Lightroom writes beside the RAW, plus an .acr file if there is one. A DNG can carry the settings inside itself instead.
3. The final export
A JPG or TIFF of the finished photo, with the look baked in.
Exporting from Lightroom
Pick the version you use. Not sure? If you edit in the Library and Develop modules and your photos live in folders on your computer, it’s Lightroom Classic. If your photos sync across your phone, tablet and computer, it’s Lightroom (cloud).
Classic keeps your edits in its catalog. These steps write them to a file, then collect everything you need.
Finish your edit
Make sure the photo looks exactly the way you want it in the Develop module.
Save your settings to a file
With the photo selected, choose PhotoSave Metadata to File in Develop, or MetadataSave Metadata to File in Library. Shortcut: Ctrl+S on Windows, ⌘S on Mac.
This writes an .xmp file next to your RAW. If your edit uses masks, Denoise or other heavy edits, Lightroom also writes an .acr file.
Find the RAW and its sidecars
Right-click the photo and choose Show in Finder on Mac or Show in Explorer on Windows. The RAW, its .xmp and any .acr sit side by side with the same name.
Export the final photo
Choose FileExport… (Ctrl+Shift+E / ⌘⇧E). Under File Settings, set Image Format to JPEG and Color Space to sRGB, then export. Leave the size as it is.
- DSC_4821.NEFOriginal / RAW
- DSC_4821.xmpXMP sidecar
- DSC_4821.acrACR sidecar · only if Lightroom wrote one
- DSC_4821.jpgFinal export
Shooting DNG?
Lightroom saves your settings inside the DNG itself, so there’s no .xmp. After step 2, upload the DNG and your final export. That’s all you need.
The Lightroom app that syncs your photos to Adobe’s cloud. Your originals live in the cloud, so you export a copy of the original along with its settings.
Finish your edit
Open the photo in Lightroom on your computer and make sure the edit is done.
Export the original with its settings
Choose FileExport… (Ctrl+Shift+E / ⌘⇧E) and set File Type to Original + Settings, then export.
You get a copy of the RAW plus an .xmp with your edit. If Lightroom also writes an .acr, keep that too. DNG originals carry the settings inside the file, with no separate sidecar.
Export the final photo
Export again, this time with File Type set to JPG and Dimensions set to Full Size.
- IMG_2210.CR3Original / RAW
- IMG_2210.xmpXMP sidecar
- IMG_2210.jpgFinal export
Edited on your phone?
Lightroom on iOS and Android doesn’t write a settings file we can read yet. Your edits sync to the cloud, though: open the photo in Lightroom on your computer and follow the steps above. The final JPG can still come from your phone.
Making your reel
From files to a post-ready video in five steps. Everything has sensible defaults, so you can render without changing a thing.
Start a project
Go to Create a reel, give it a title, and pick which Lightroom you exported from.
Upload your files
Drop all of them in at once. Each file is matched to its slot by its extension, and anything that can’t be placed is set aside for you to assign.
Check the detected edits
You’ll see every setting we found in your edit, with its exact value. If something looks off, there’s a link to let us know.
Customize the storyboard
Pick the format first, then adjust as much or as little as you like: the on-screen text, background and transitions, how long each step shows, which steps appear and in what order, and the carousel’s shape. Use Save as theme to reuse your choices on the next reel.
The three formats, as real outputs:
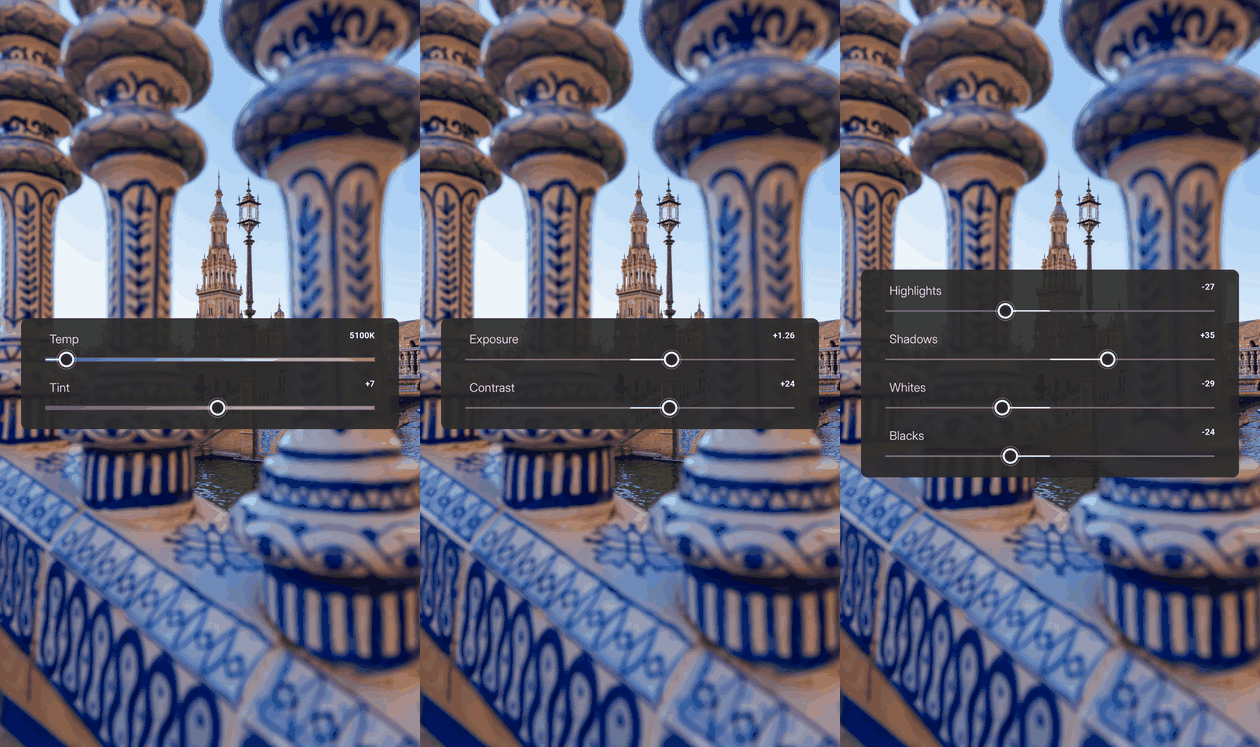
One step at a time
Each change gets its own moment.
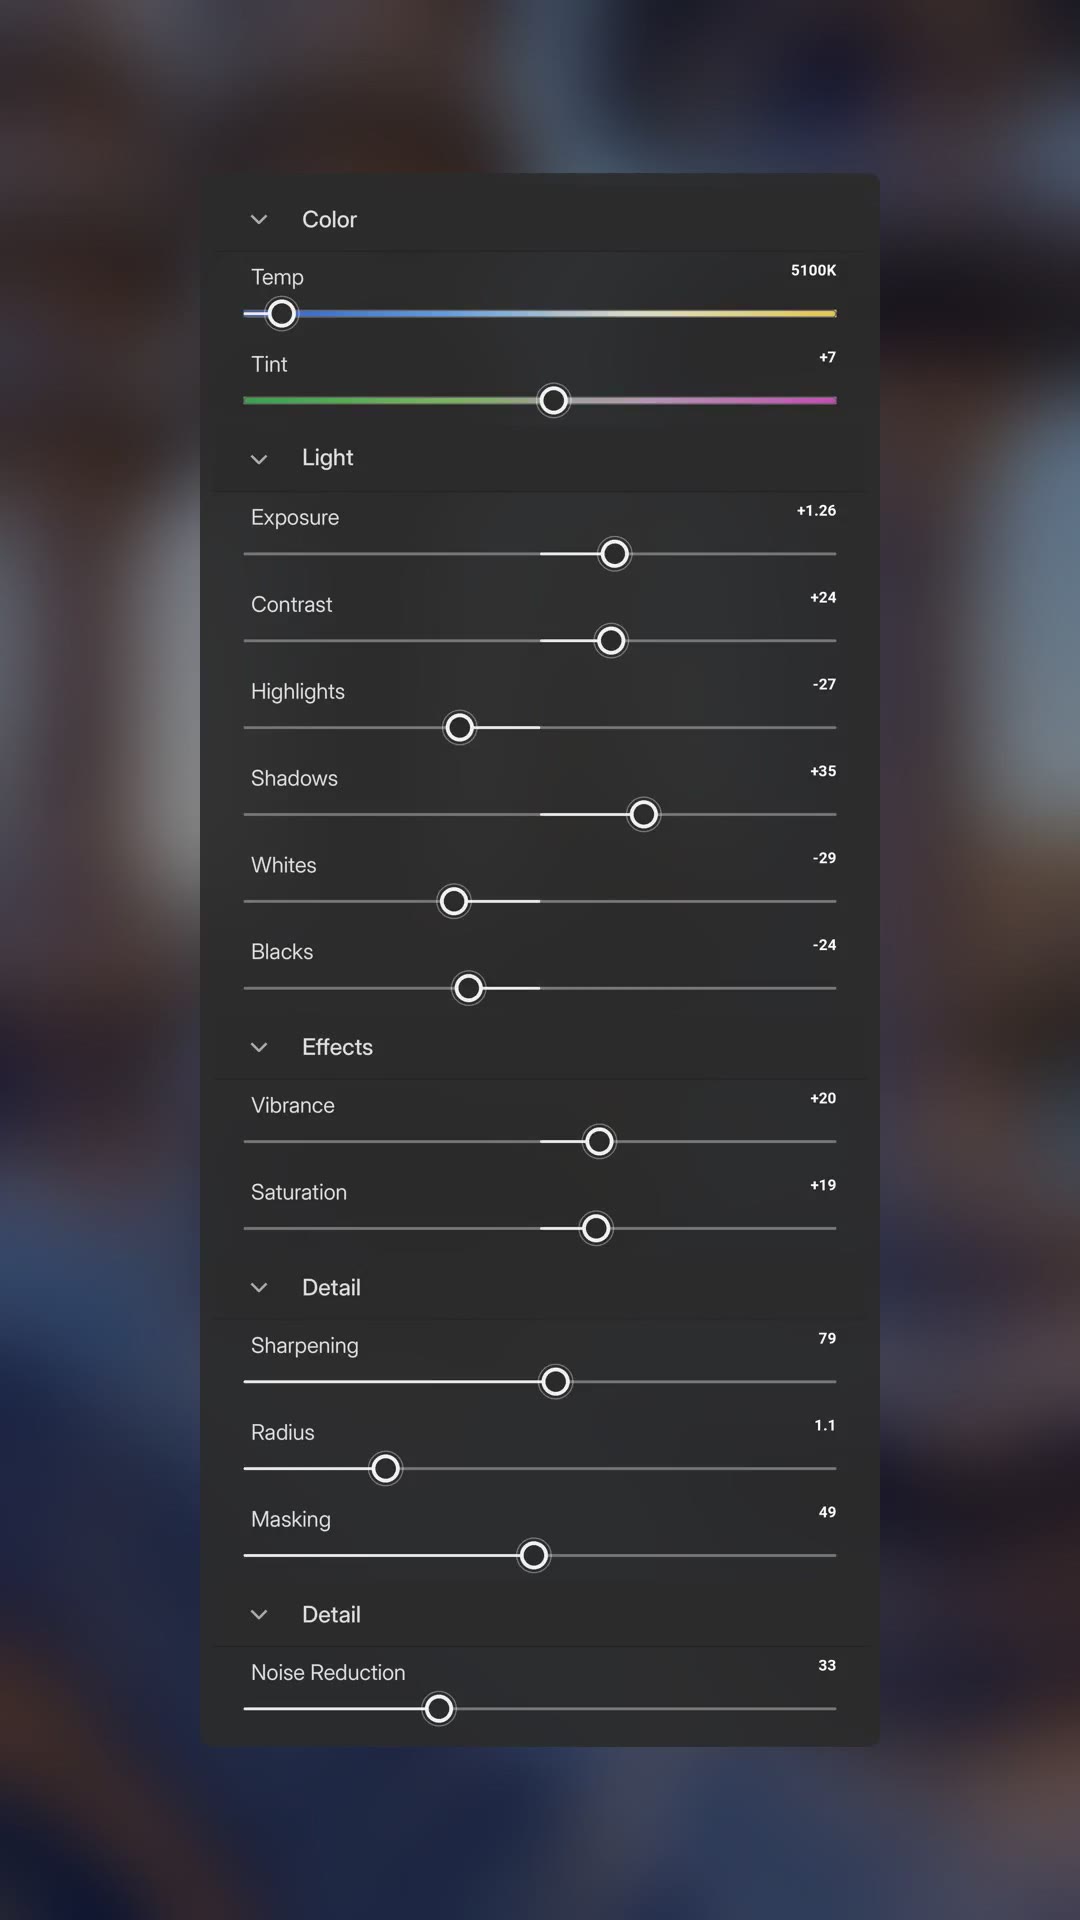
Everything at once
One card with every setting.
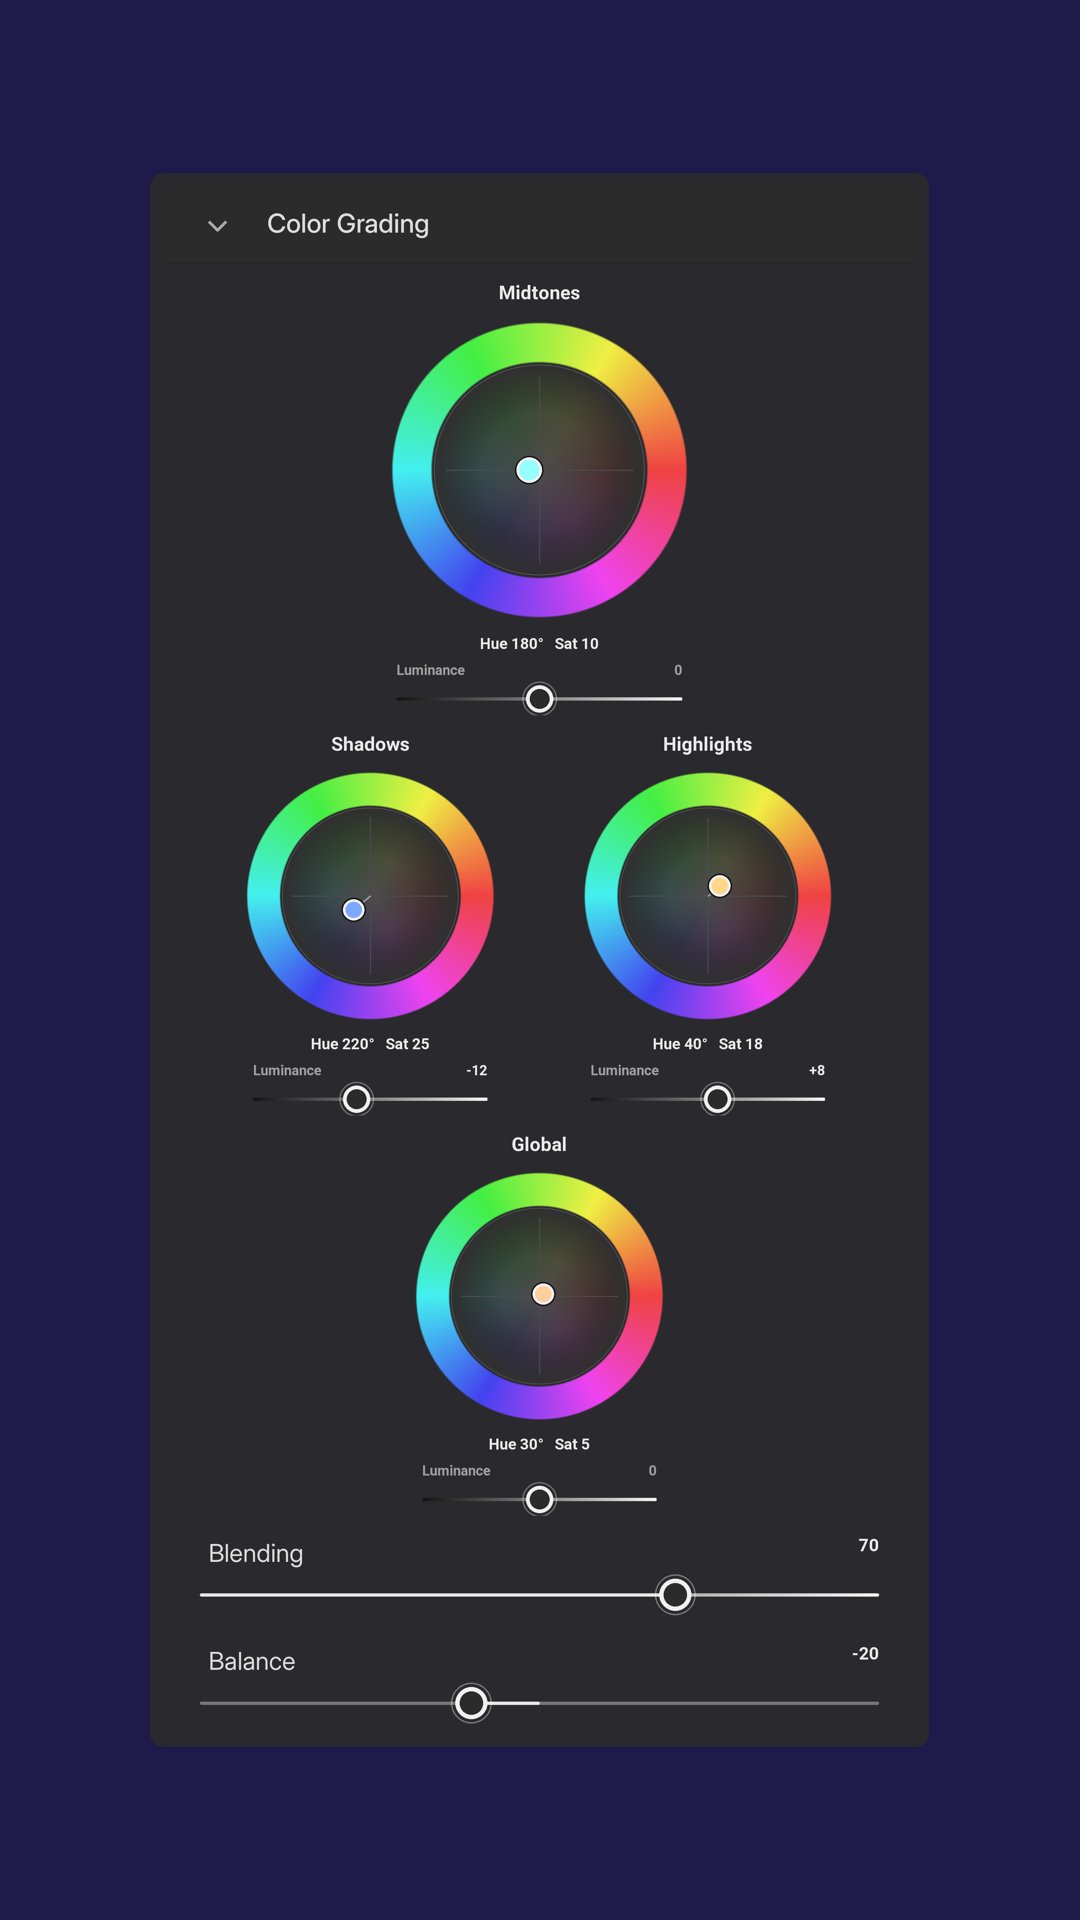
Just the color work
The Color Mixer and Grading wheels, on their own.
Render and download
Start the render. It runs on our servers, so you can close the tab and come back from My Projects. When it’s done, download the MP4 and the carousel as a ZIP of images.
Some options depend on your plan. The pricing page shows what each one includes.
Location stories
A different kind of project: each photo appears after a satellite view zooming in to where you took it.
- Choose Location story when you start a project. No sidecar files needed, just your finished photos as JPG, PNG, TIFF or HEIC.
- Set each photo’s place. It’s read automatically from photos with GPS data, or you can search for a place, paste coordinates or click the map.
- Customize the satellite view, marker, place names and timing, then render a video and a matching carousel.
Frequently asked questions
I can’t find an .xmp file.
Lightroom Classic keeps edits in its catalog until you save them to the file. Run Save Metadata to File first (step 2).
Lightroom (cloud) only writes one when you export with File Type set to Original + Settings (step 2).
If your original is a DNG, there won’t be one: the settings are stored inside the DNG. Just upload the DNG.
What’s the .acr file, and do I need it?
Newer versions of Lightroom put heavier edit data, such as masks, Denoise and distraction removal, in a second file ending in .acr. If one sits next to your .xmp, upload it too. If there isn’t one, you don’t need it.
What happens if I don’t upload an .xmp?
The project runs in limited mode: a before/after reveal of your original and final photo, without the step-by-step settings.
I don’t have the RAW or the sidecar. Can I still make a reel?
On paid plans, yes. Choose Before/after photos + settings screenshots when you start a project. Upload your before and after photos with screenshots of your Lightroom panels, and an AI model reads the slider values. You review them before anything is rendered.
Why are some steps marked “detected only”?
Masks and AI features like Denoise and Super Resolution are recognized and listed in your reel, but the in-between frames can only approximate them. Your final frame is always your own export, so the reel ends on exactly the photo you made.
Can I replace a file after uploading it?
The original and the final export can’t be changed once uploaded. To use different ones, start a new project. The .xmp and .acr can be replaced until you first save the storyboard.
Does starting a project count against my plan?
No. A project only counts when you render it, and rendering the same project again is free. Projects you never render are removed automatically after a short time untouched, and My Projects shows how long each one has left.
Can I change my reel after it’s rendered?
Yes. Go back to the storyboard, make your changes and render again for free. The new render replaces the previous one, so download anything you want to keep first.
How long are my projects kept?
Projects are deleted automatically after a set time, files included. My Projects and your dashboard show a note when one is close to being removed. Download your video and carousel once they’re ready.
Do my downloads include camera or GPS data?
No. Exported videos and carousel images never carry EXIF or GPS data. In a location story, you choose whether place names appear on screen.
How do I delete my account?
On your dashboard, use Delete account at the bottom of the page. It permanently deletes every project and theme.